

By icemen123 CreativeCreations Follow
More by the author:

About: I'm 15 and live in Irene SD. I like to make all kinds of stuff from drift trikes to bookshelves. Go and check out my YouTube channel CreativeCreations for more projects and how-to’s. More About icemen123 »
Dazzle the guests at your next get-together with this amazing 3D cutting board! Or create a gift for that "hard to buy for" person on your list.
Depending on the size of the cutting board you are planning to build, you will need different lengths of wood.
- Butcher Block Oil (for the finish)
Plane all three types of wood to the same size. I cut and planed my pieces of wood down to about 1 1/2" by 1". The lengths were various sizes.
There are many different methods used to make a diamond shape out of each type of wood. I chose to use the miter saw method. Set the miter saw to 30 degrees. Cut the end off of the piece of wood. Measure from end to end on your cut, use this measurement to set up a stop on the miter saw. Now cut all the wood into diamond-shaped pieces.
After cutting all the pieces, start gluing them all together until you have enough for your cutting board. Once again, this will depend on the length and width you desire your cutting board to be.
After the glue dries on the smaller pieces, lay them out the way you want them, making sure to have them in the same pattern . Place pieces of wood along the outside. Then glue and clamp all the pieces together.
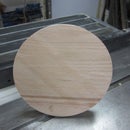
After the glue dries, plane the cutting board down. Then cut off the excess pieces to create a straight edge on the cutting board.
Cut some wood for the trim around the cutting board. (I chose walnut for the trim.) Glue the trim around the cutting board on two opposite sides. Then after it dries, cut the leftover material off. Do again on the other two sides. then plane it down. Now it's almost done.
If there are any cracks or holes, just mix some sawdust and glue together and scrape it on the spots. Then sand it off and it should look pretty nice.
Use a 1/4" router bit around all the edges. Sand it down until your happy with it. To finish the cutting board I put a couple of coats of butcher block oil on it. I also put some cork pads on the bottom (make sure to use the best side as the top).